Jetson Tips: Setup External Storage
If the root partition of your Jetson is smaller than 32 GB we recommend setup an external drive to store the Lumeo configuration, neural network models and media files resulting from pipeline deployments.
On this page we share the steps required to create the partition and configure the gateway to automatically mount the external drive. Perform these steps before running the Lumeo installer.
When prompted for this option during the Lumeo installation script you should provide the mount point folder of the external drive.
Warning: Those commands change your partition table and might result in data loss in your disks. Proceed with caution!
Step 1) List the disks and partitions table
Run the command lsblk -lp -o name,size,type,fstype,model,mountpoint
lumeo@jetson:~$ lsblk -lp -o name,size,type,fstype,model,mountpoint
NAME              SIZE TYPE FSTYPE MODEL            MOUNTPOINT
/dev/loop0         16M loop vfat
/dev/sda         14,9G disk        USB Flash Drive
/dev/sda1        14,9G part ext4
/dev/mtdblock0      4M disk
/dev/mmcblk0    119,1G disk
/dev/mmcblk0p1  119,1G part ext4                    /
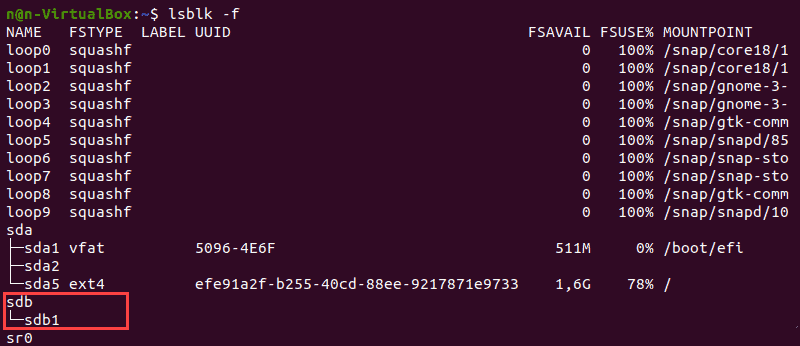
The terminal prints out the list of all block devices. The partitions that do not contain information on the file system in use are non-formatted partitions.
Another example:

Step 2) Create ext4 partition on the external disk
If your disk already has a partition (ex.
sda1,sdb1, etc) you can skip this step.
On the list from the previous step we can identify /dev/sdb as our external disk.
To create the ext4 partition run the following commands:
(
echo o
echo n
echo p
echo 1
echo
echo
echo w
) | sudo fdisk /dev/sdb```
(adjust echo 1 to the desired partition number, and /dev/sdb to the external disk name)
Step 3) Format a partition and verify it
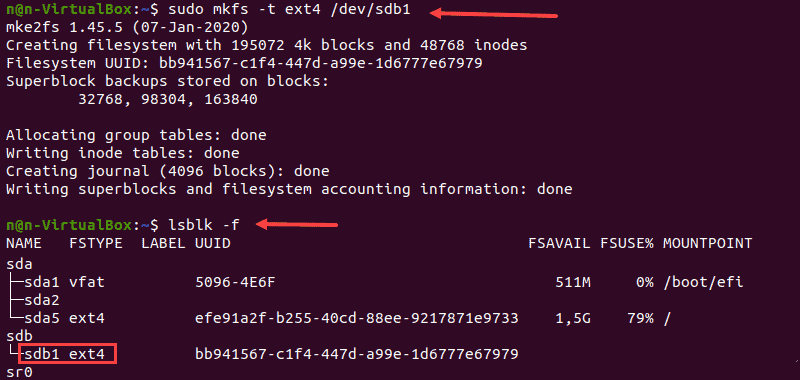
Format a disk partition with the ext4 file system using the following command:
Warning: Make sure you specify the correct partition (
/dev/sdb1will change depending on your setup)
sudo mkfs -t ext4 /dev/sdb1Next, verify the file system change using the command:
lsblk -fLocate the preferred partition and confirm that it uses the ext4 file system.

Step 4) Configure the mounting point and auto-mount
Before using the disk, create a mount point and mount the partition to it. A mount point is a directory used to access data stored in disks.
(adjust
/dev/sdb1and/mnt/sdcardaccordingly in the following commands)
Create the mount point directory:
sudo mkdir -p /mnt/sdcardMount the ext4 partition of the external disk on the new directory:
sudo mount /dev/sdb1 /mnt/sdcardChange the directory permissions:
sudo chmod ugo+rwx /mnt/sdcardAdd the entry on fstab in order the partition be mounted every time the system starts:
echo "/dev/sdb1 /mnt/sdcard ext4 defaults 0 1" | sudo tee -a /etc/fstabStep 5) Enable the usage of external storage drive in Lumeo installation
In the initial steps of Lumeo installation you have the option to enable the usage of the external storage drive by providing the external device mount directory (on this example /mnt/sdcard)

Updated 3 months ago
