
Model Conversion
This guide outlines steps to convert models so that they can be imported and used in Lumeo.
Lumeo's ability to parse your model's outputs into objects or class attributes is conditional upon the model's output layers matching the format expected by Lumeo.
This guide outlines information on expected model output layers for each Model Format and Architecture. You can verify if your model output layers match these using Netron.
Follow instructions in the table below to process/convert your model, and then head over to AI Models for the steps required to add your model to the Lumeo platform.
Custom Model Output ParsingIf your model's output layers don't match the ones built-in to Lumeo and there is no conversion guide that works, you can choose to write a Custom Model Parser.
Supported Formats and Architectures
| Model Architecture | Model Format | Expected Output Layers | Instructions |
|---|---|---|---|
| DetectNet | ✅ ONNX | Natively supported. | |
| FasterRCNN | ✅ ONNX | Natively supported. | |
| MobileNet | ✅ ONNX | Natively supported. | |
| MRCNN | ✅ ONNX | 1: generate_detections2: mask_head/mask_fcn_logits/BiasAdd | Natively supported. |
| Resnet | ✅ ONNX | 1: conv2d_bbox2: conv2d_cov/Sigmoid | Natively supported. |
| SSD | ✅ ONNX ↩️ Tensorflow | 1: num_detections2: detection_scores3: detection_classes4: detection_boxes | Tensorflow: Convert to ONNX using the Guide below. |
| SSD Azure CustomVision | ✅ ONNX (Azure Customvision.ai General (compact) S1 Model) | 1: num_detections2: detected_scores3: detected_classes4: detected_boxes | Natively supported. Check the complete procedure in the |
| D-FINE | ✅ ONNX | 1: pred_logits2: pred_boxes | Natively supported when |
| RFDETR | ✅ ONNX | 1: dets2: labels | Natively supported when exported to ONNX using RFDTR package |
YOLOv3 YOLOv3 Tiny YOLOv4 YOLOv4 Tiny | ✅ Darknet / YOLO Native | 1: num_detections2: detection_boxes3: detection_scores4: detection_classes | Natively supported. Check the YOLO Native Models (Darknet) guide |
YOLOv5 YOLOv8 YOLOv9 YOLOv10 YOLOv11 YOLOv12 | ✅ ONNX | 1: output0 | Natively supported, when |
YOLOv5 YOLOv6 YOLOv7 YOLOv8 YOLOR YOLOX DAMO-YOLO PP-YOLOE YOLO-NAS | ✅ ONNX Lumeo YOLO 🚫 ONNX 🚫 PyTorch | 1: boxes2: scores3: classes | Convert the weights to |
Guides
Tensorflow to ONNX
-
Github Repo: https://github.com/onnx/tensorflow-onnx
-
install tf2onnx:
pip3 install -U tf2onnx- convert Tensorflow savedmodel to ONNX:
change the current working directory to the one that contains thesaved_model.pbfile, for example:
cd /home/user/saved_model_tensorflowperform the conversion:
python3 -m tf2onnx.convert --inputs-as-nchw sequential_1_input:0 --saved-model ./ --output ./converted_model.onnxAlternatives:
python3 -m tf2onnx.convert --inputs-as-nchw sequential_1_input:0 --tflite ./ --output ./converted_model.onnxpython3 -m tf2onnx.convert --inputs-as-nchw sequential_1_input:0 --target tensorrt --tflite ./ --output ./converted_model.onnxNote: Our inference engine expects the input data in NCHW format (N: batch_size, C: channel, H: height, W: width), so its required change the default input format of Tensorflow (NHWC) to this using the --inputs-as-nchw argument followed by the input layer name, which on the above example is sequential_1_input:0.
A file named converted_model.onnx will be created on the same folder, that's the one you should upload as weights file to update your model in Lumeo console.
YOLO Native Models (Darknet)
The original YOLO models (YOLOv2, YOLOv2 Tiny, YOLOv3, YOLOv3 Tiny, YOLOv4 & YOLOv4 Tiny) trained in the Darknet format can be imported to your Lumeo Application without perform any additional conversion.
YOLO weights pretrained on the MS COCO dataset (80 classes):
- YOLOv4x-Mish [cfg] [weights]
- YOLOv4-CSP [cfg] [weights]
- YOLOv4 [cfg] [weights]
- YOLOv4-Tiny [cfg] [weights]
- YOLOv3-SPP [cfg] [weights]
- YOLOv3 [cfg] [weights]
- YOLOv3-Tiny-PRN [cfg] [weights]
- YOLOv3-Tiny [cfg] [weights]
- YOLOv3-Lite [cfg] [weights]
- YOLOv3-Nano [cfg] [weights]
- YOLO-Fastest [cfg] [weights]
- YOLO-Fastest-XL [cfg] [weights]
- YOLOv2 [cfg] [weights]
- YOLOv2-Tiny [cfg] [weights]
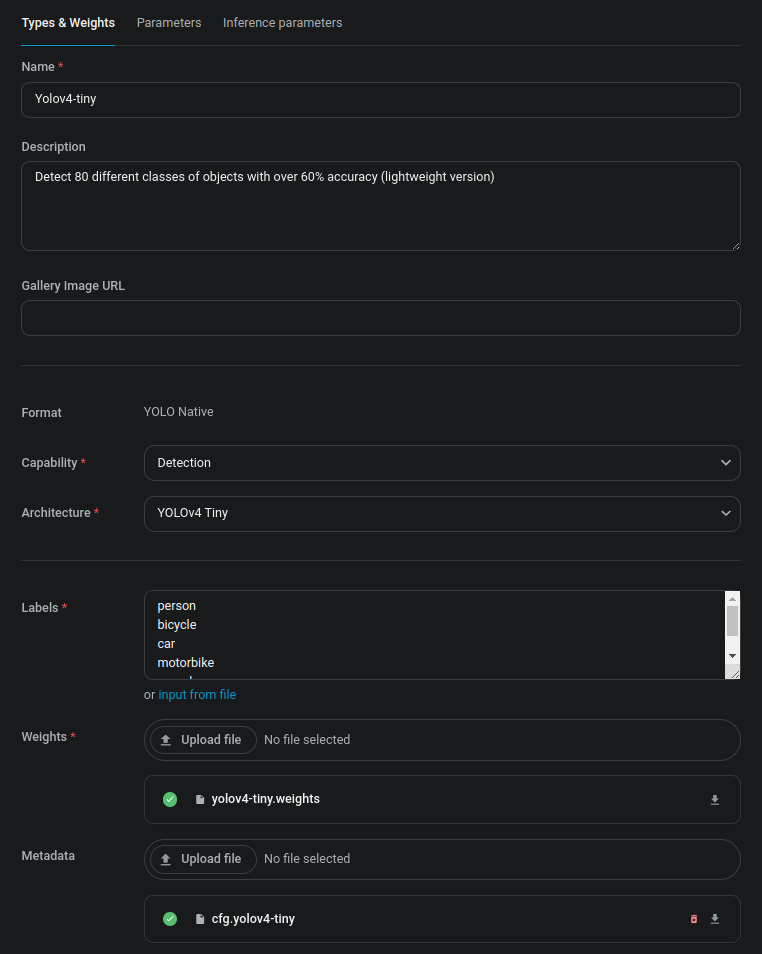
Here's the procedure for the YOLOv4 Tiny model:
- Download the model's
cfg,weights, and classlabelsfiles.
wget https://raw.githubusercontent.com/AlexeyAB/darknet/master/cfg/yolov4-tiny.cfg
wget https://github.com/AlexeyAB/darknet/releases/download/darknet_yolo_v4_pre/yolov4-tiny.weights
wget https://raw.githubusercontent.com/AlexeyAB/darknet/master/data/coco.names- Upload the model's files to an AI Model in Lumeo Console.
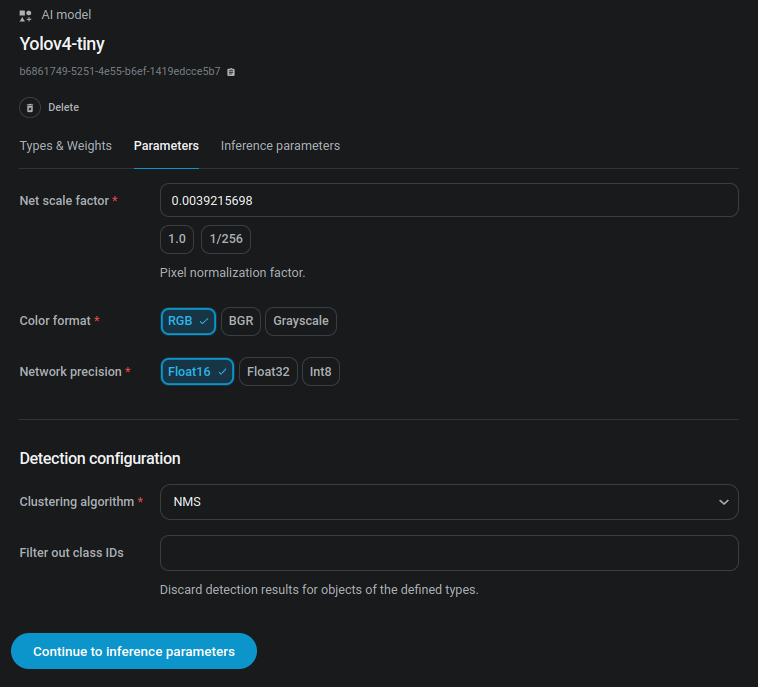
Click onDesign -> AI Models -> Add Modeland fill the entries as in the following images:
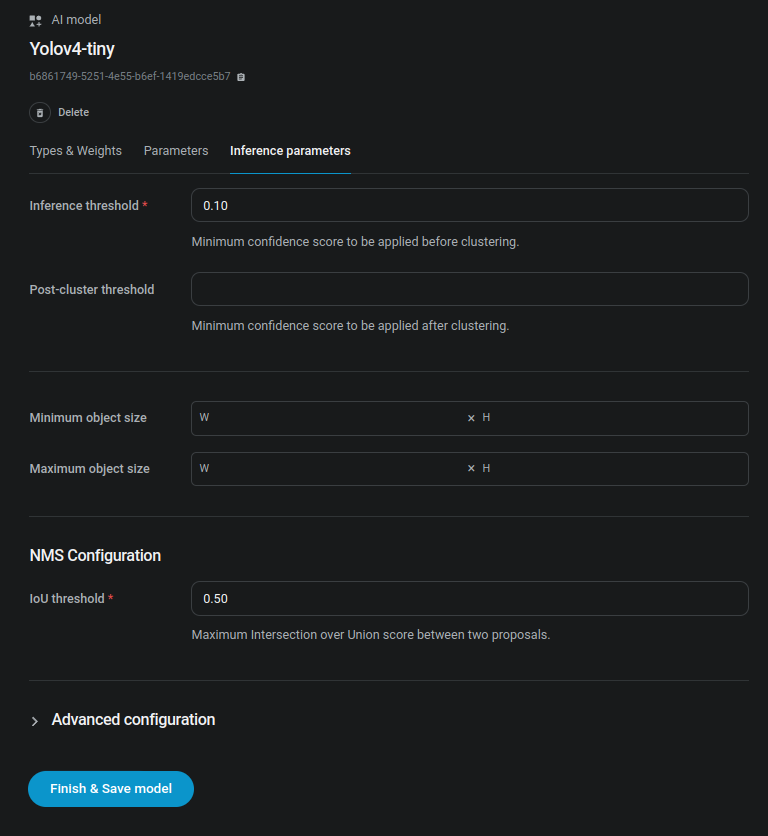
After clicking in "Finish & Save model" button, you can start using your newly uploaded model in the AI Model Node
YOLOv5, YOLOv8, YOLOv9, YOLOv10, YOLOV11, YOLOV12, YOLO26 exported to ONNX using Ultralytics
When using Ultralytics library or container you can export the PyTorch model weights (.ptfile ) to onnx using the following command:
yolo export model=yolov8n.pt format=onnx dynamic=True simplify=True opset=17
(adjust yolov8n.pt with the path & filename of final weights file of the training)
Then on Lumeo's Console click Design -> AI Models -> Add model and fill the form using these settings:
| Types & Weights tab property | Value |
|---|---|
| Format | ONNX |
| Capability | Detection |
| Architecture | YOLOv8 (or YOLO26) |
| Inference engine | Parallelized |
| Labels | Type the model labels or import the labels file |
| Weights | Upload the previously generated ONNX file |
| Parameters tab property | Value |
|---|---|
| Net scale factor | 0.0039215698 (click on 1/256) |
| Color format | RGB |
| Network precision | Float16 |
| Input layer name | images |
| Input layer dimensions | 3;640;640(adjust accordingly to the expected input dimensions) |
| Output layer names | output0 |
| Clustering algorithm | NMS (or 'No Clustering' for YOLO26) |
The export scripts from official repositories can also be used:
YOLOv9 repository | YOLOv10 repository | YOLOv12 repository
YOLOv5, YOLOv6, YOLOv7, YOLOv8, YOLOR, YOLOX, DAMO-YOLO, PP-YOLOE & YOLO-NAS conversion to ONNX Lumeo YOLO format
ONNX Lumeo YOLO formatThe conversion procedure of those formats to ONNX Lumeo YOLO weights can be found in Lumeo's models-conversion repository.
Roboflow RFDETR conversion to ONNX
Install the library:
pip install "rfdetr[onnx]"Export to ONNX:
from rfdetr import RFDETRNano, RFDETRSmall, RFDETRMedium, RFDETRLarge

model = RFDETRSmall(resolution=512)  # or RFDETRNano(), RFDETRMedium(), RFDETRLarge()

# For Jetsons in JetPack 5.0 use opset_version=16
model.export(
    output_dir="output/rfdetr-small-512",
    shape=(512, 512),
    opset_version=17,
    dynamic_batch=True,
)
Updated 26 days ago