
Lumeo-Ready Gateways
Lumeo-Ready Gateways are devices that ship with Lumeo pre-installed and a web based interface for easy configuration & setup in the field.
Features
Lumeo-Ready gateways make it easy to setup a device in the field to process video analytics. They:
- come with a web interface for easy configuration
- can be discovered using MDNS or Windows Explorer so you can easily find their IP address
- can be linked to your Lumeo account using the workspace ID and token
- can run checks to ensure Lumeo cloud services are reachable from the local network
- support one-click setup of Tailscale and AllXON for remote management
- support automatic updates so you are always running the latest Lumeo Gateway software
Just plug in the device, configure it to connect to Lumeo and you are ready to deploy analytics to it!
Getting Started
Lumeo-Ready gateways ship with a web interface that make it easy to configure device IP addresses and link it to your Lumeo account. Once linked, the device can then be managed from Lumeo Console. Follow these steps to setup your Lumeo-ready Gateway device.
Setup
- Power on and plug in the Lumeo Gateway into your network. Ensure your network allows for DHCP assignments.
- Discover the Lumeo Gateway device via Windows Explorer (Windows 10 or newer) or MDNS (aka Zeroconf) Browser on a separate laptop or tablet. Alternatively, skip ahead if you know the IP address of the device.
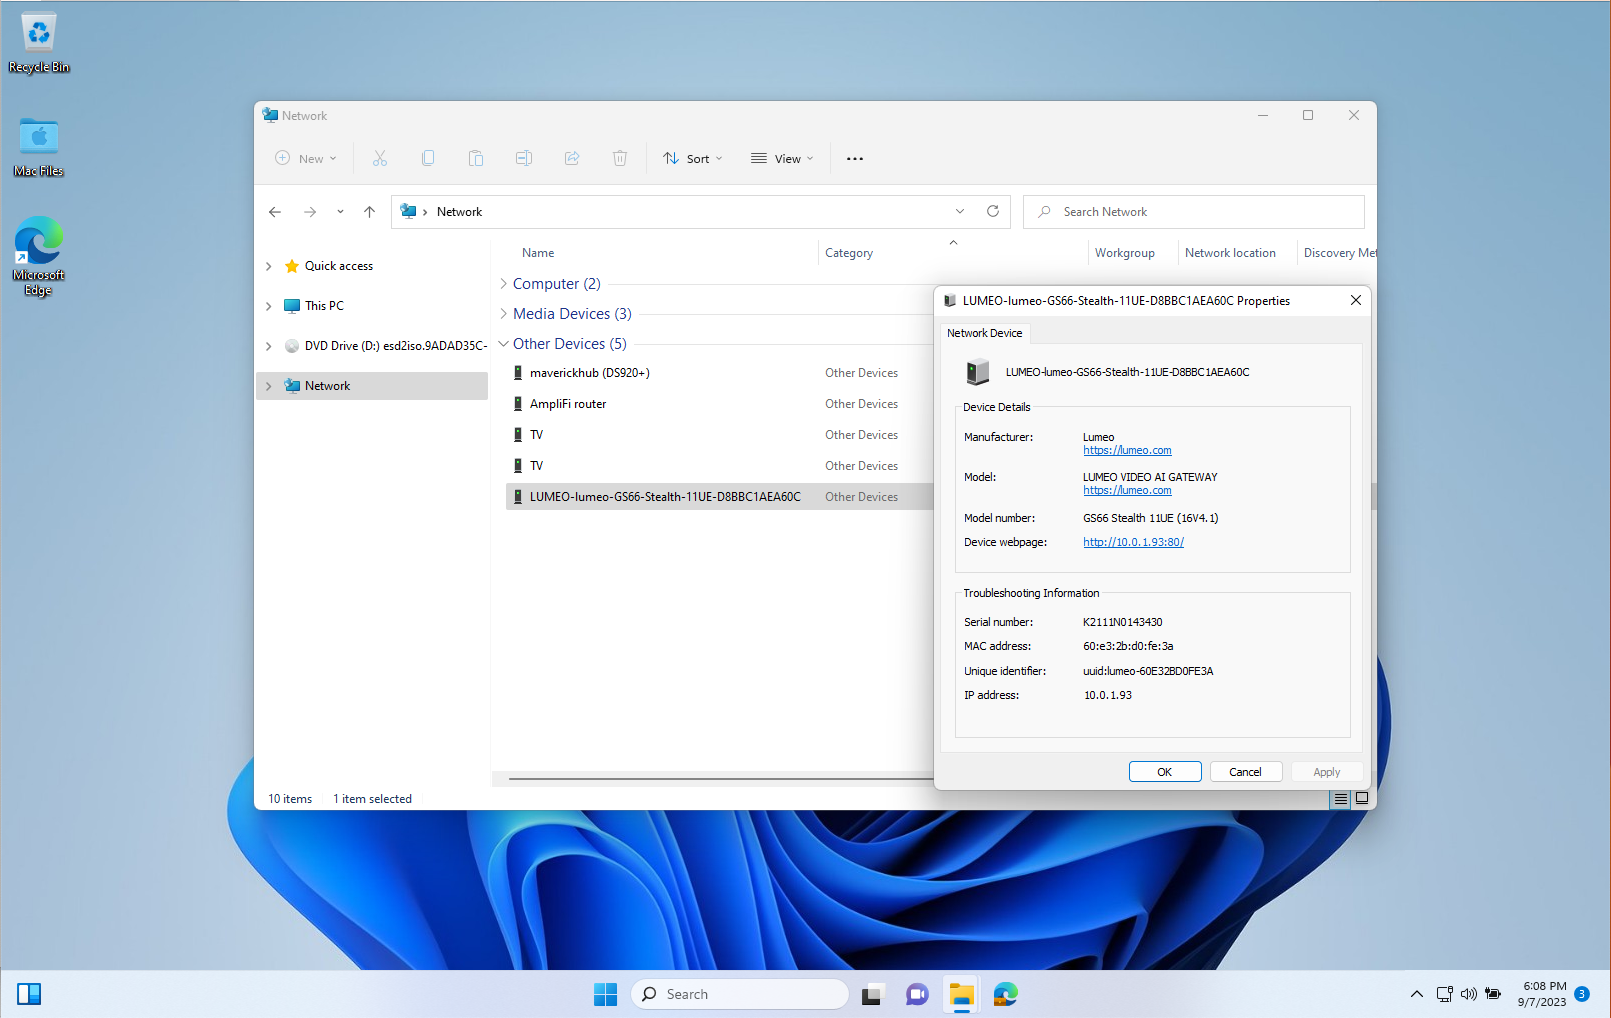
Lumeo-Ready gateways are discoverable via Windows Explorer (Windows 10+) if SSDP is enabled on your network.
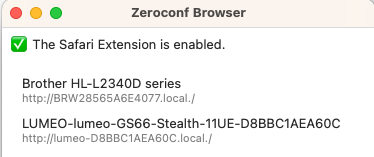
Lumeo-Ready gateways are discoverable via MDNS/Zeroconf/Bonjour Browsers on Linux and Mac OS.
- Navigate to the Gateway management interface using a web browser, and create a device-specific password. This is separate from your Lumeo account password, and is used just to manage the device.
Note: You will need to accept the browser warning since device uses self-signed certificates.

Create a device-specific password
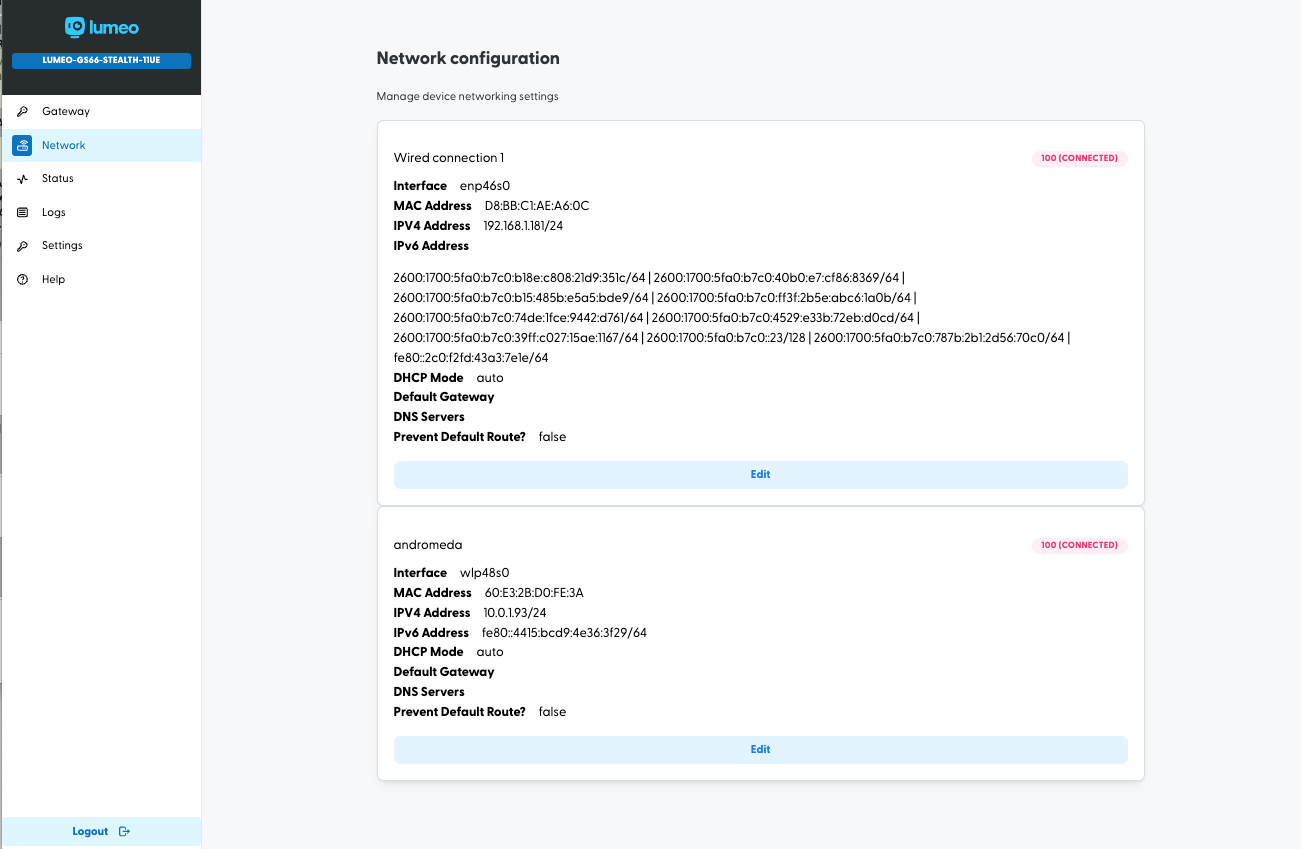
- Configure the network interfaces after logging into the Gateway web interface. If you have dual network setup, be sure to configure the IP addresses correctly.
Configure Network
- Run a connectivity check to Lumeo cloud services by visiting the Status tab. Ensure there are no connectivity errors. If you see any, refer to Security & Network guide to setup your network to allow the Gateway to connect to Lumeo's cloud services.
As a general note, Lumeo Gateway requires unrestricted outbound connectivity to make secure connections to various Lumeo services and may not work well with VPN or outbound connectivity restricted networks.
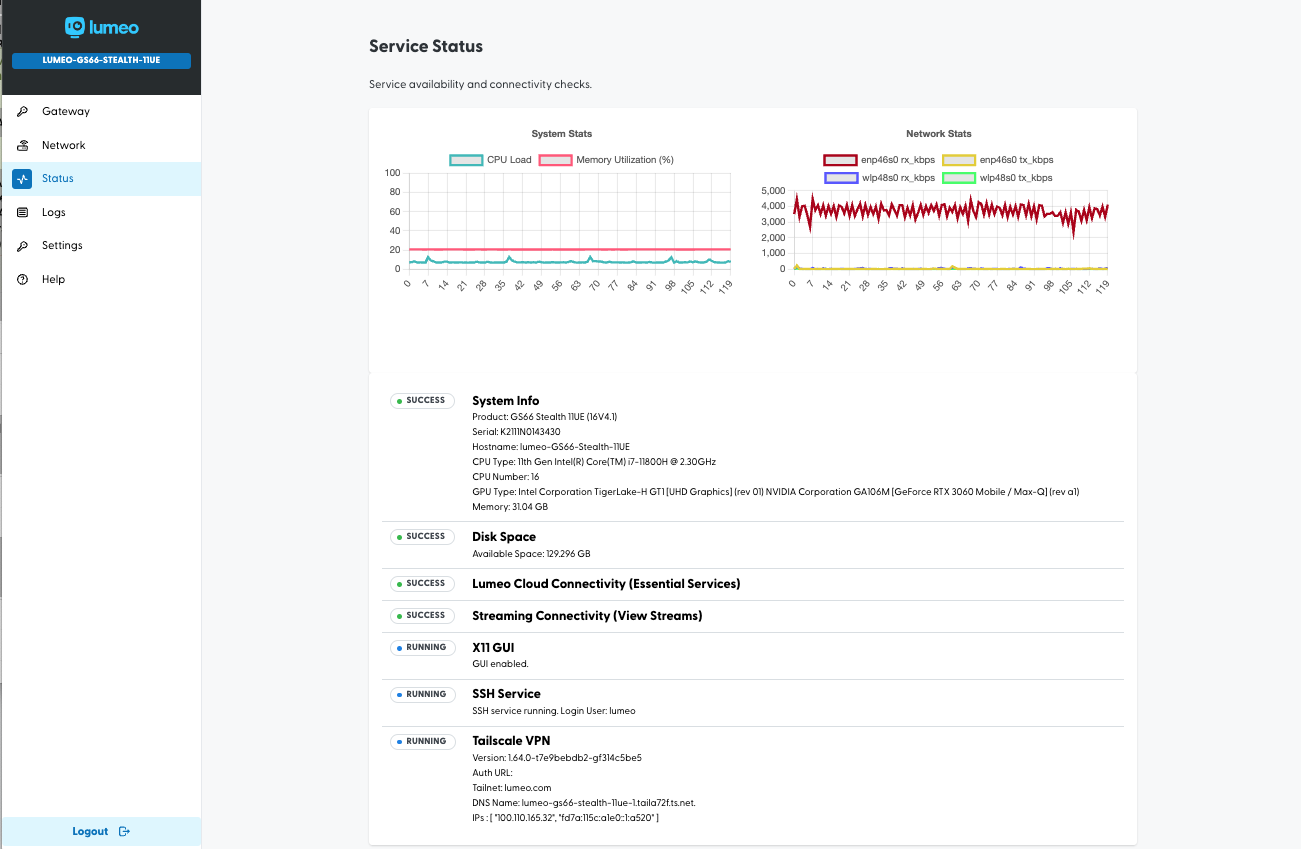
View status and run connectivity check
- Log in to the Lumeo Console and generate a Gateway token to link the Gateway to your Lumeo account in the cloud.
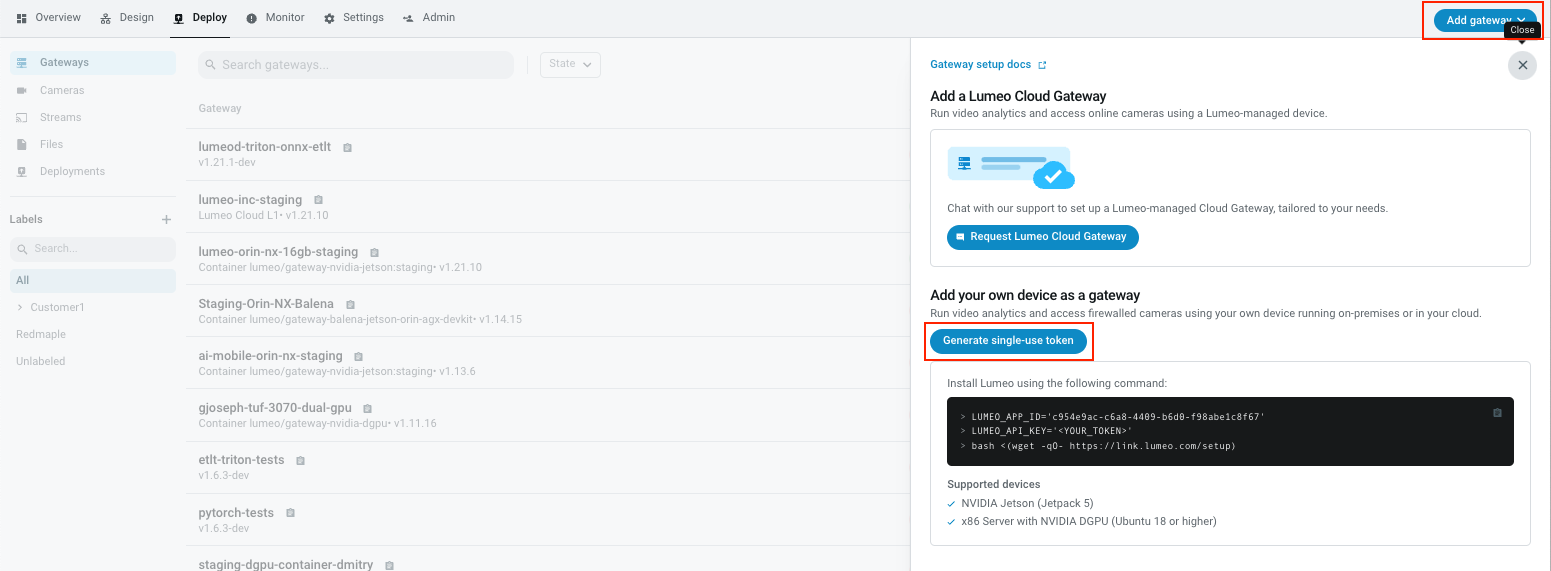
Go to Deploy -> Add Gateway -> Generate single-use token
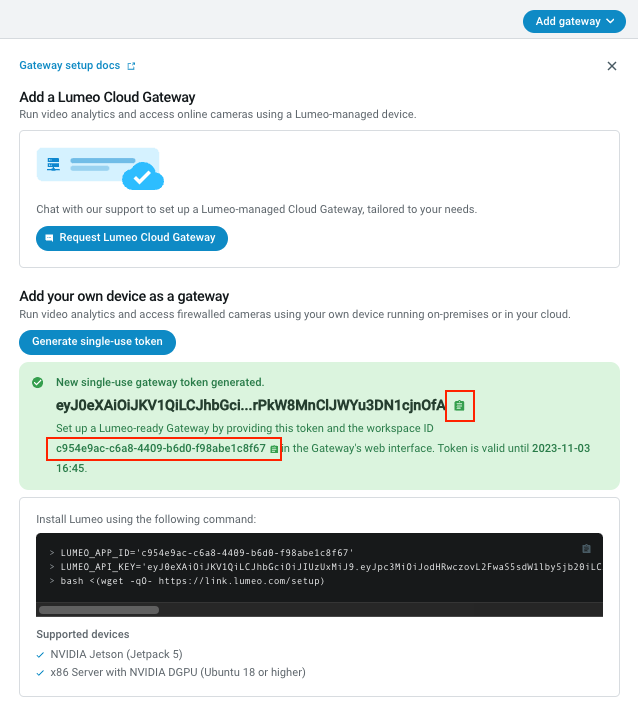
Copy the token and workspace ID.
- Head to the Gateway web interface -> Gateway section. Click on Connect to Lumeo Workspace, and provide the workspace ID and token you copied from the Console.
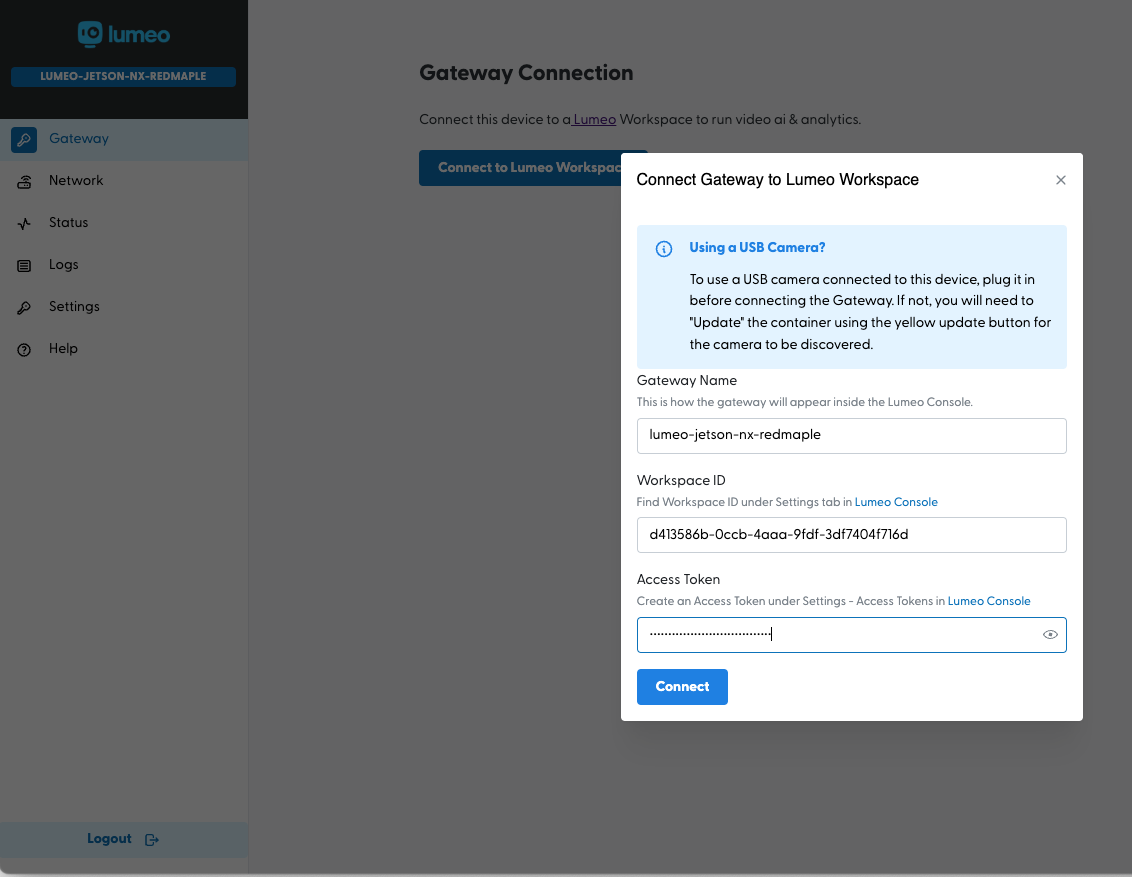
Provide the token and workspace ID. Then click Connect.
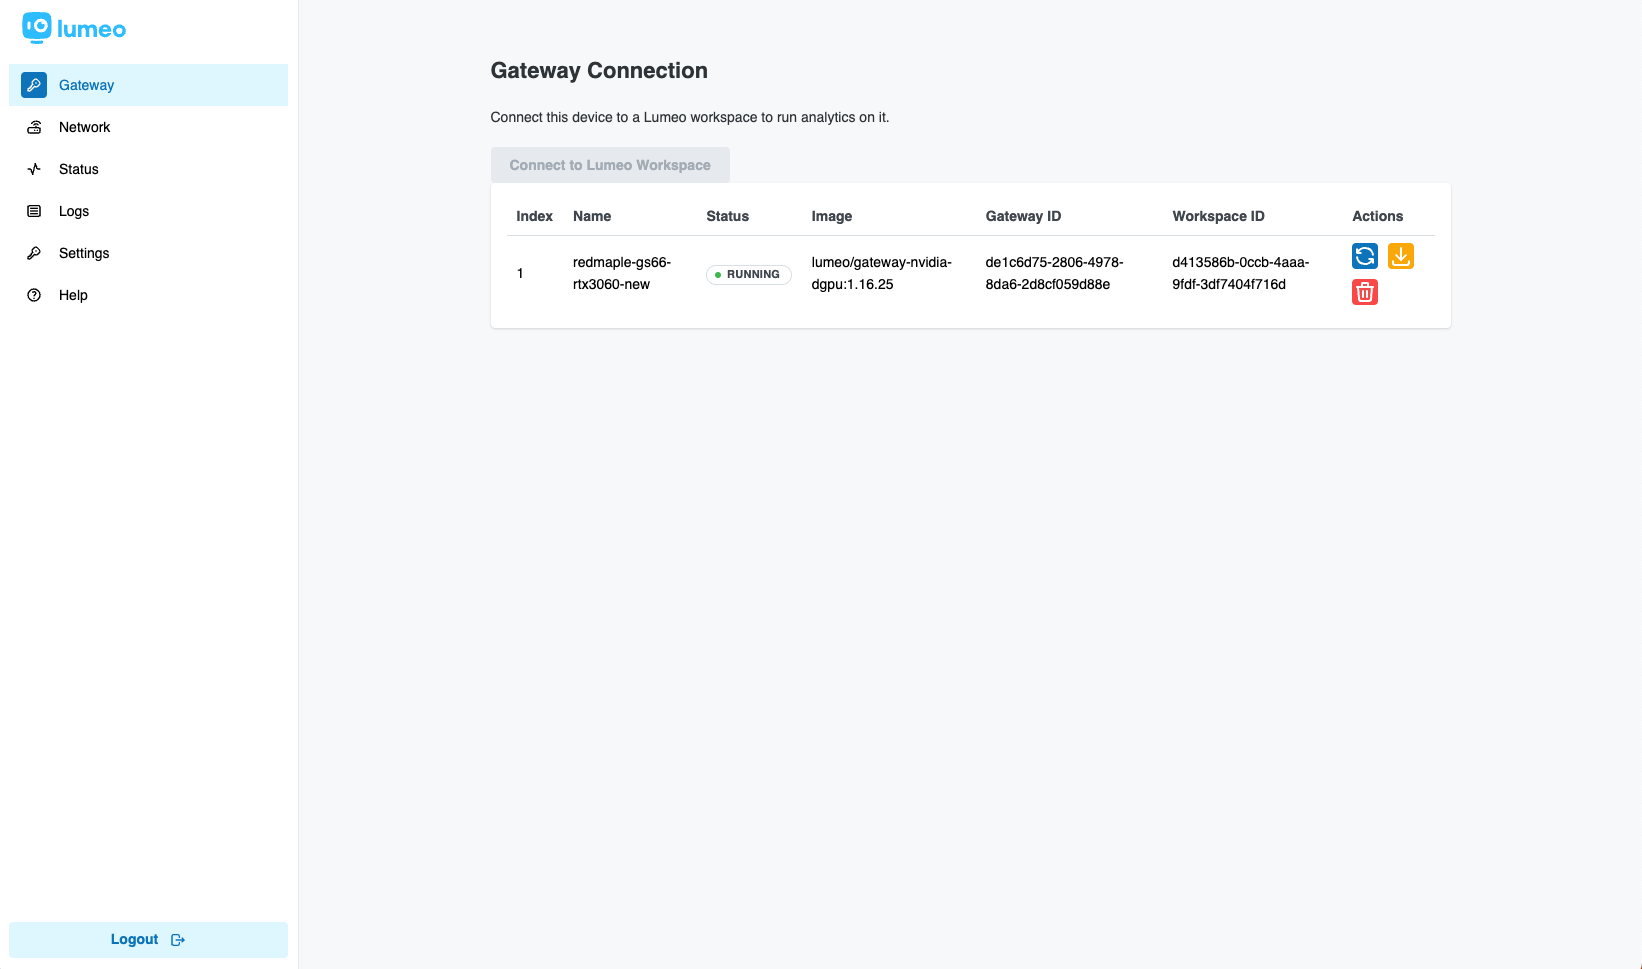
When connected, you will see it listed in the table as shown above. Verify the status is "Running".
- You are now ready to setup cameras and deploy analytics to this device from the Lumeo Console. Follow the Camera Setup Guide to discover and link Cameras to your Lumeo workspace.
- If you need to set the device up for remote access, see Additional Settings section below.
Device Credentials
- Local user (for SSH and terminal) login is enabled, but devices ship with X server (GUI) disabled. You can change local user credentials via the web interface. The default credentials will be provided on a card included with your device.
- The Web interface uses a separate account which can be created only once on a new device. If you forget it's password, see Troubleshooting section below for reset instructions.
Camera Import
Import cameras from Genetec Security Center, Hanwha Vision WAVE, Hanwha Vision PNM-C32084RQZ, HikCentral using the web interface using the Camera Import tab.
For other types of cameras, use the Lumeo Console to import them as ONVIF cameras or RTSP streams.
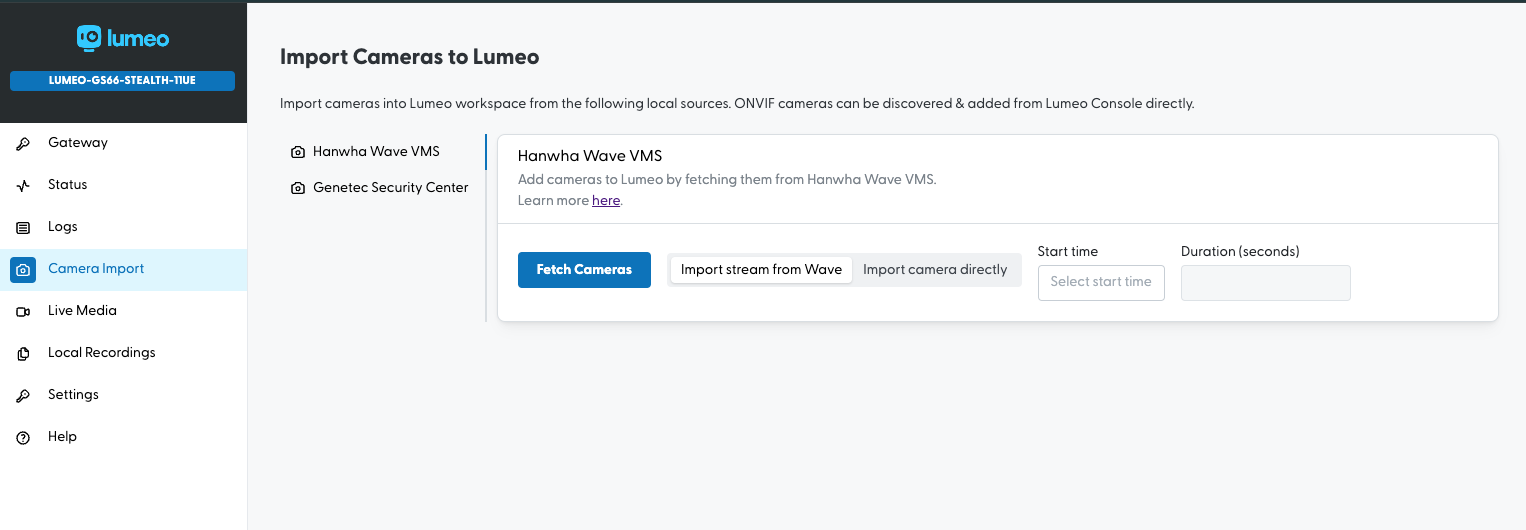
- Genetec import : Genetec Security Center Import
- Hanwha WAVE import : Hanwha Wave Import
- Hanwha Vision PNM-C32084RQZ import : PNM-C32084RQZ Setup
- Other Camera / RTSP import guides: Camera & Streams
Local Recordings
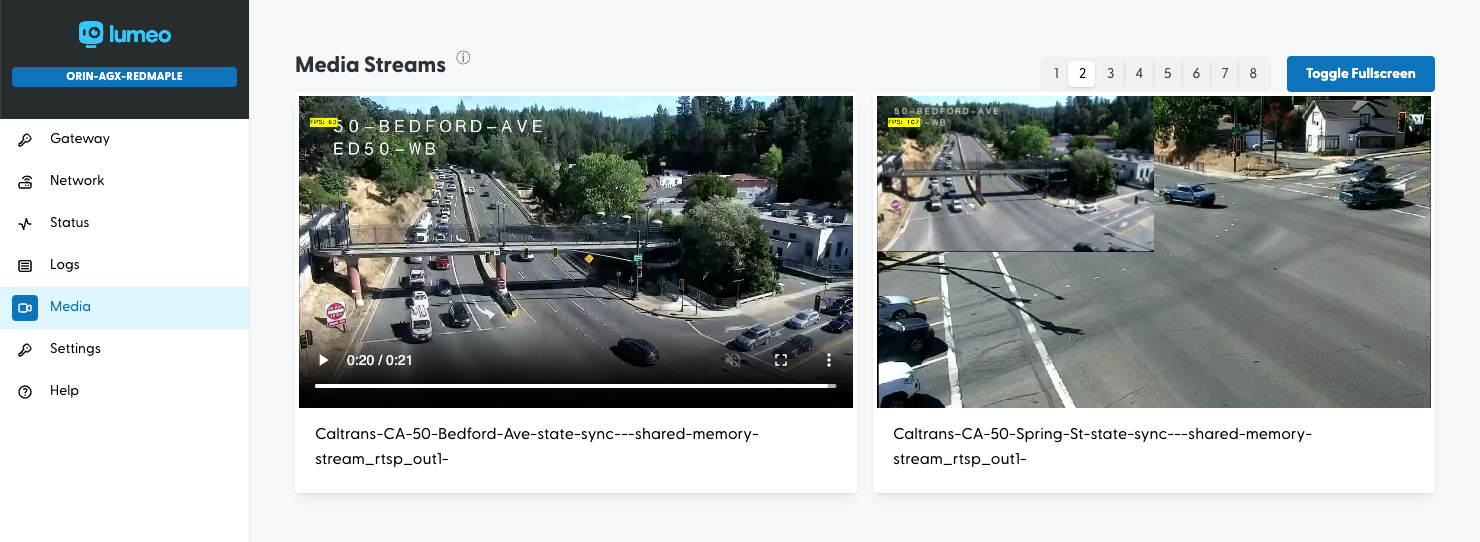
Any clips saved locally using the "Local" mode of the Save Clip node can be viewed using the Local Recordings section.
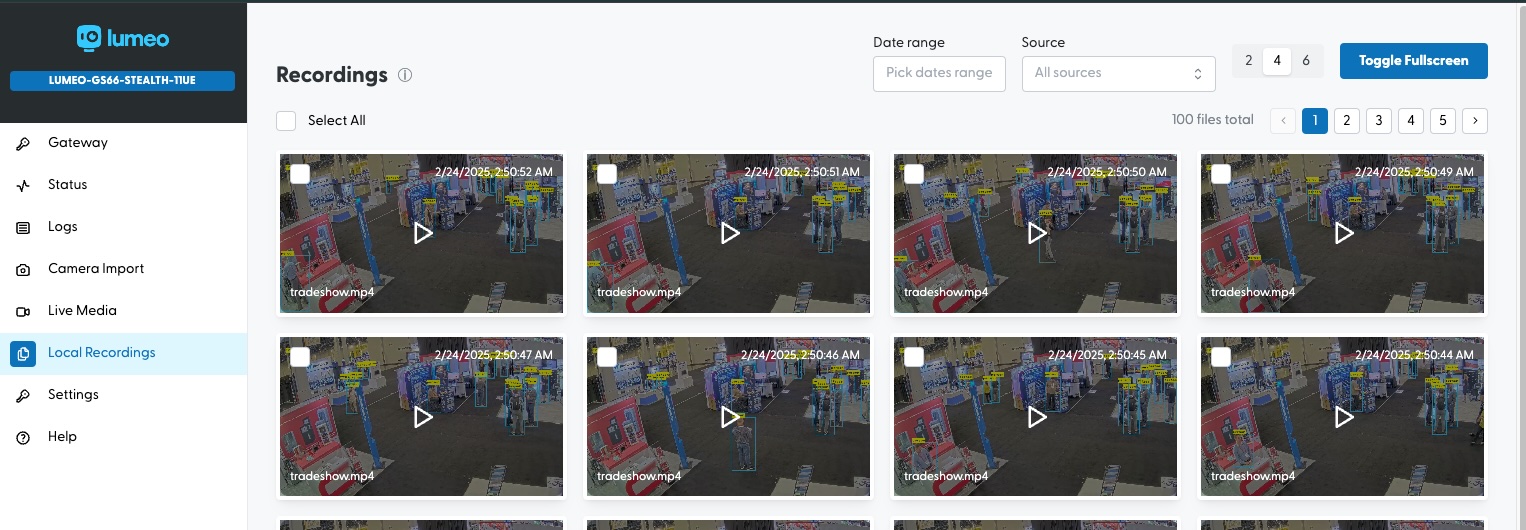
View Local recordings
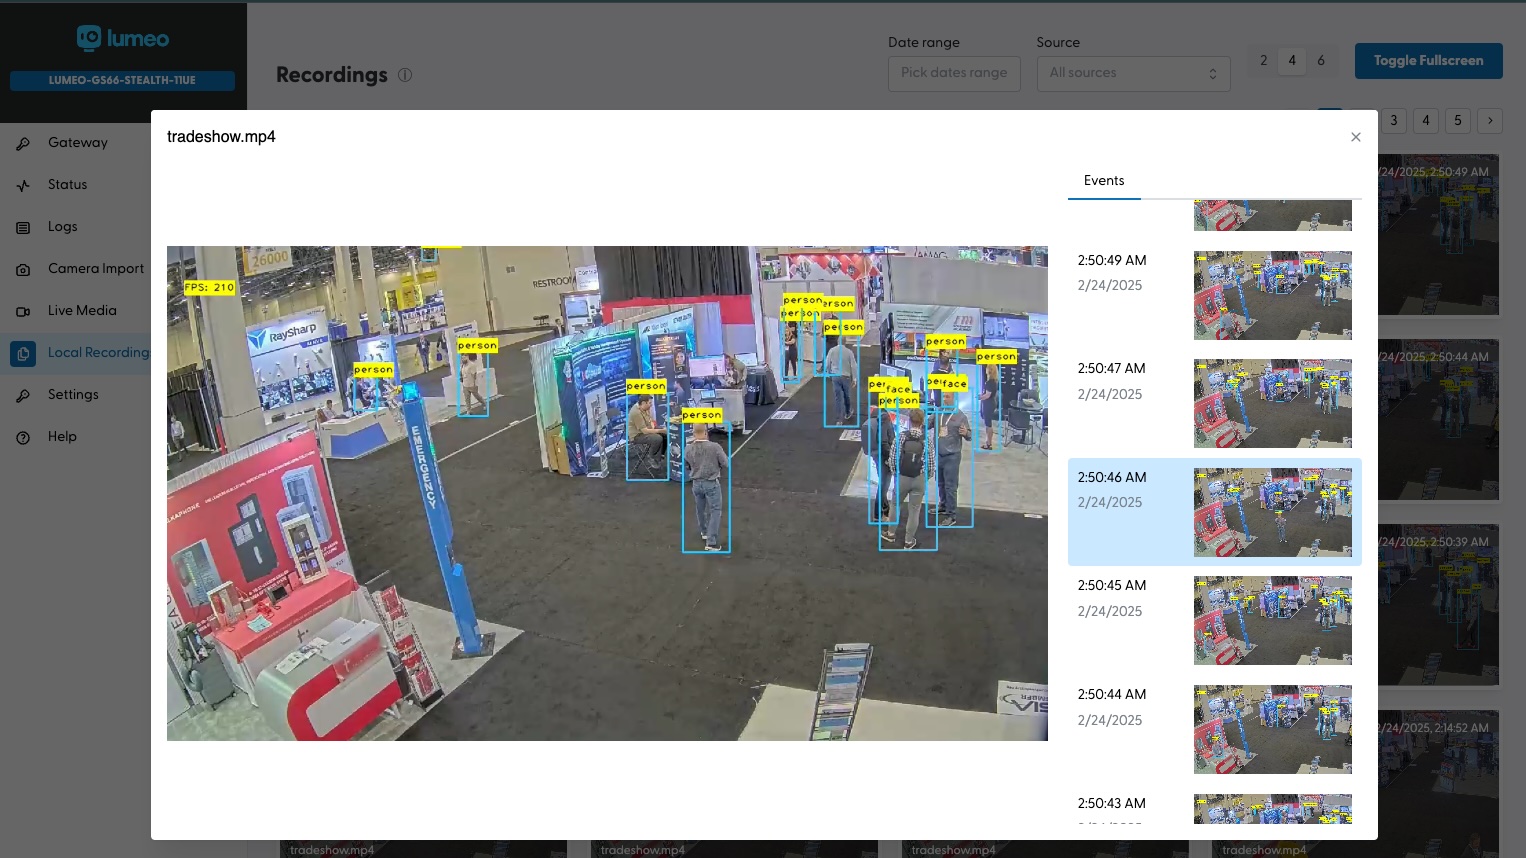
Playback local recordings
Local Media Server
View Output RTSP streams locally
You can start a local media server on the Gateway to serve sample streams, view gateway's output streams locally and enable ONVIF. To do so, head to Settings -> Media Server, and enable it, setting a media password.
Then click the Local Streams tab below and "Refresh Streams" if you don't see any output streams in the list.
Note: You must first deploy pipelines with output RTSP streams on the gateway using Lumeo's web console for the Local streams to appear here.
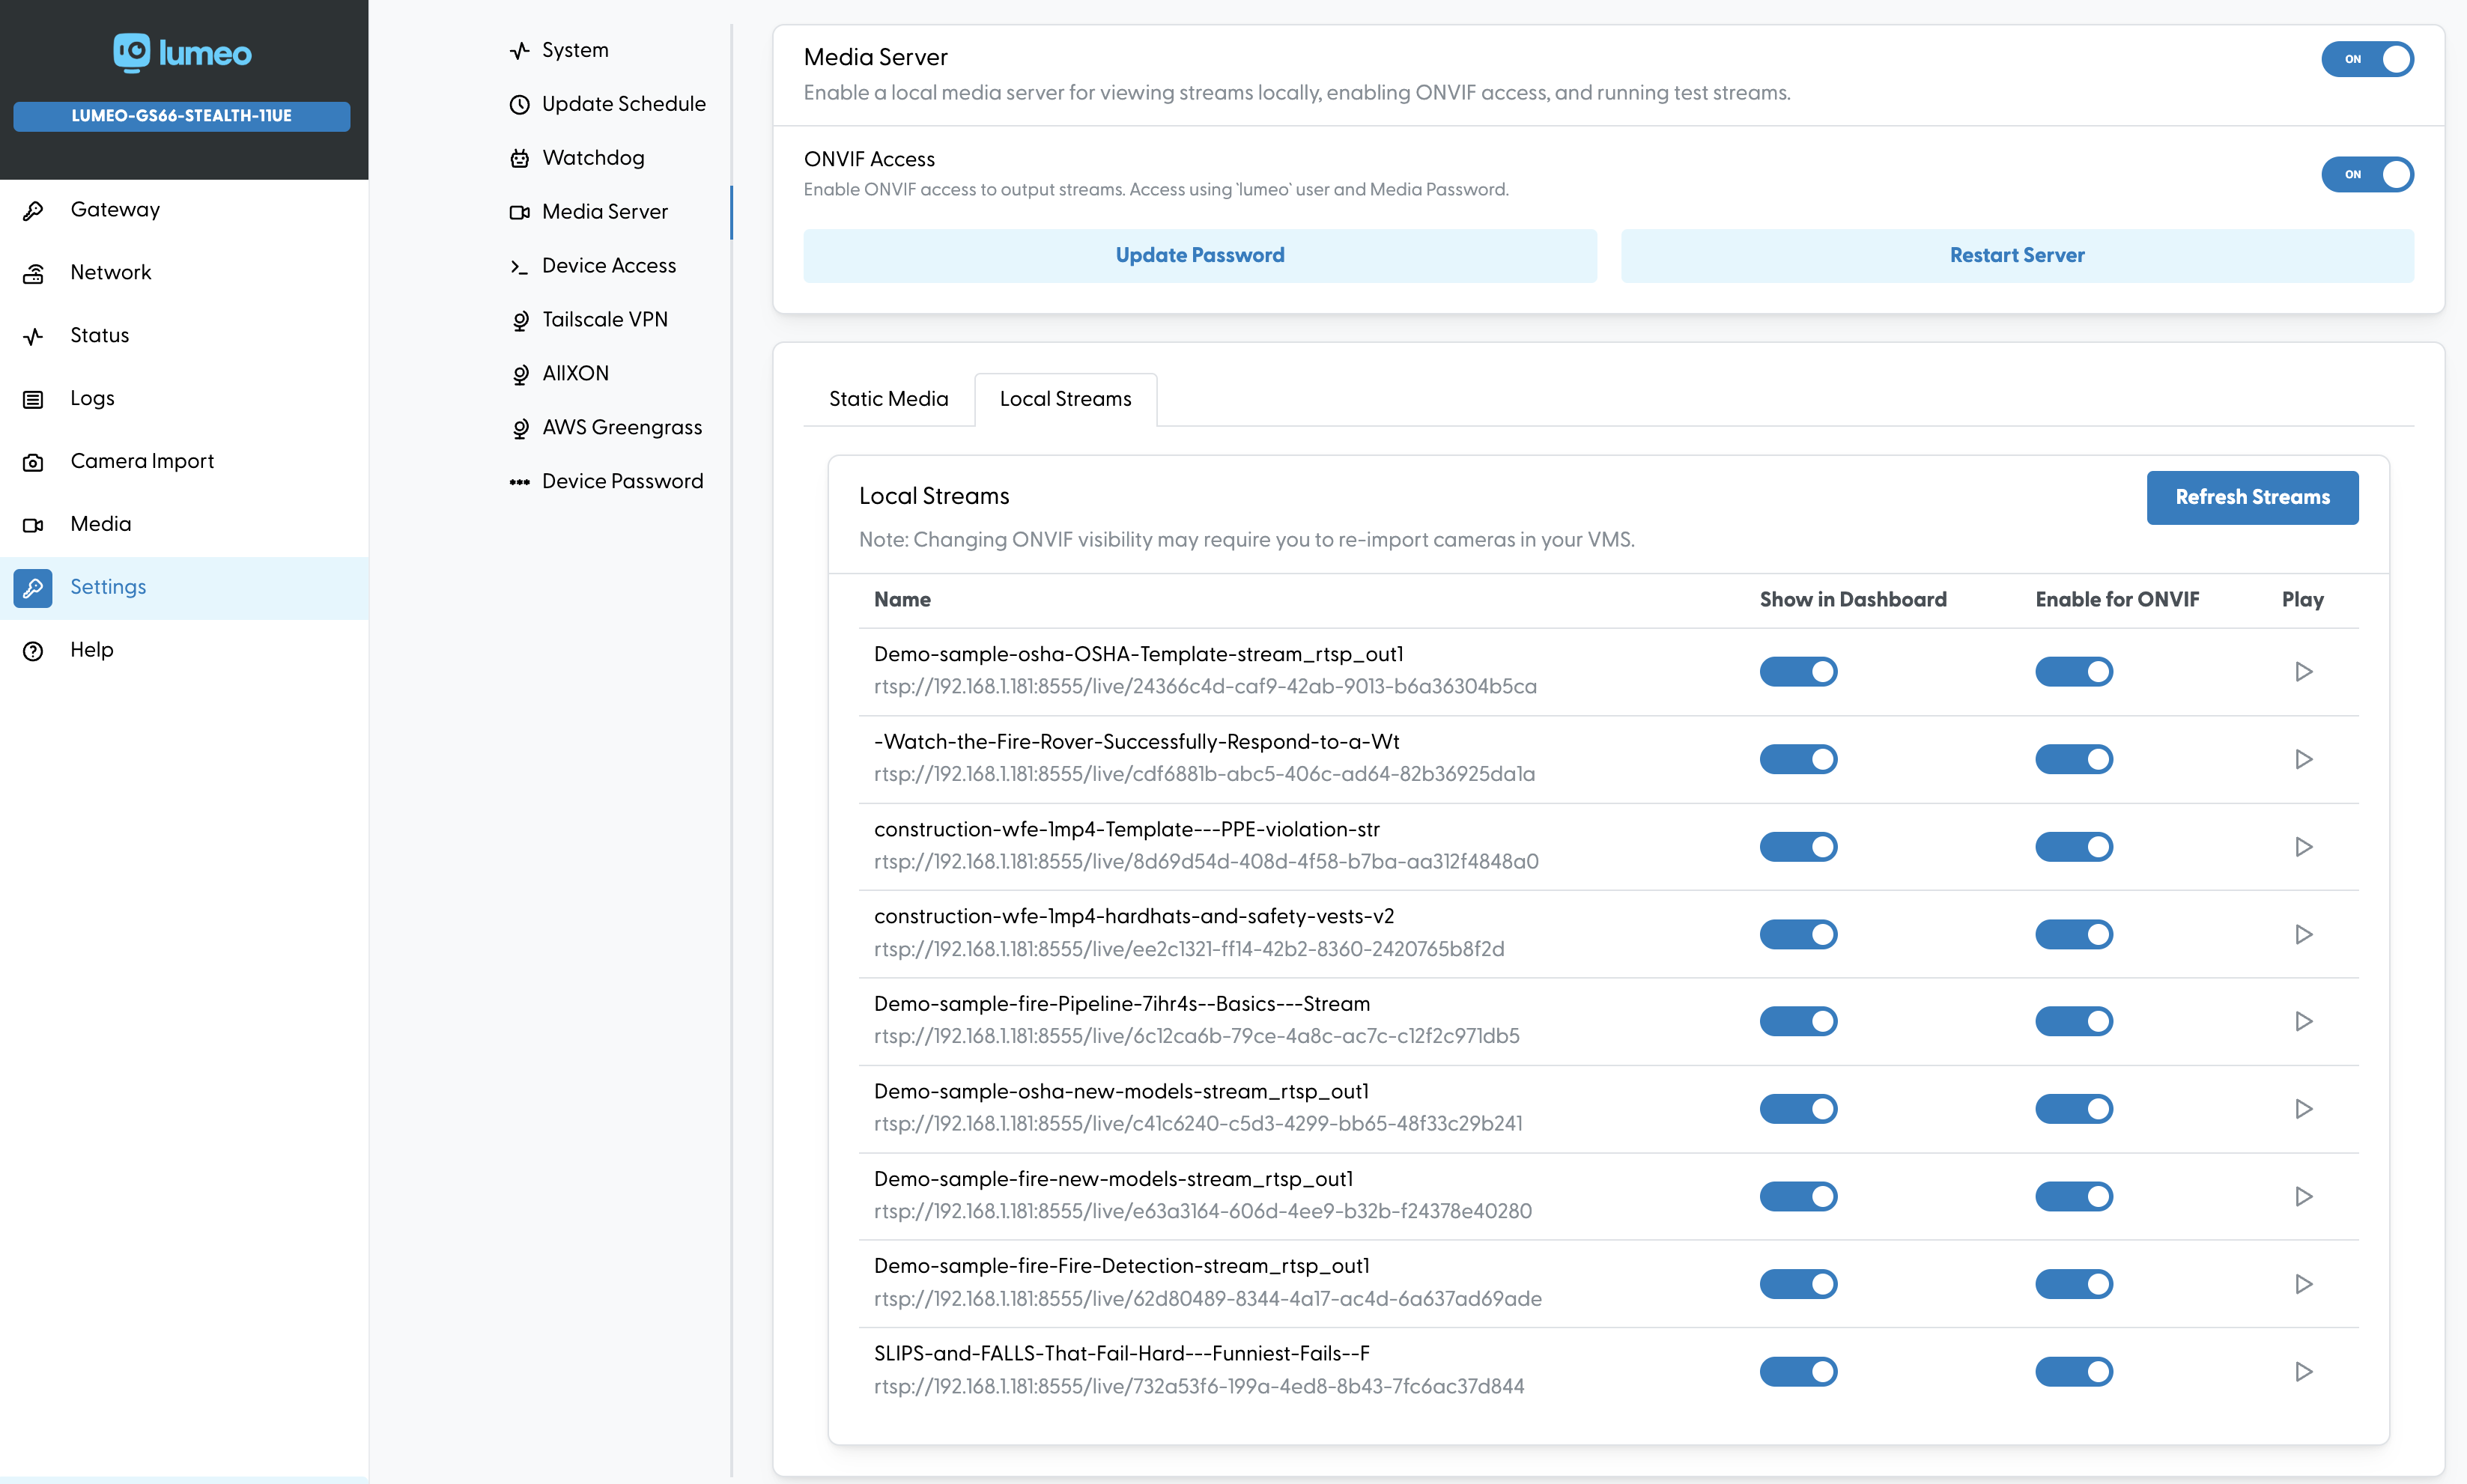
Turn on the media server, view list of Local output streams below, and refresh them if you don't see any. Toggle "Show in Dashboard" off for any streams you don't want to view in the Media view on the left.
Playback Gateway streams locally under the Live Media section. You will need to sign in using the Media Server credentials (username : lumeo , password: <media password>) when prompted.
ONVIF access
Enable ONVIF access for output RTSP streams by enabling the ONVIF access toggle, then select specific output RTSP streams available via ONVIF using the Local Streams tab below.

You can then access these selected RTSP output streams using ONVIF (username : lumeo, password : <media password>). ONVIF device URL is : http://<gateway-ip>:80/onvif/device_service
Sample RTSP streams
After enabling the Media Server, head to the "Static Media" tab to download sample clips or upload your own files to use as streams, and then add streams generated from those sample clips to Lumeo by using the "+" Add to Lumeo button.

Additional Settings
Logs
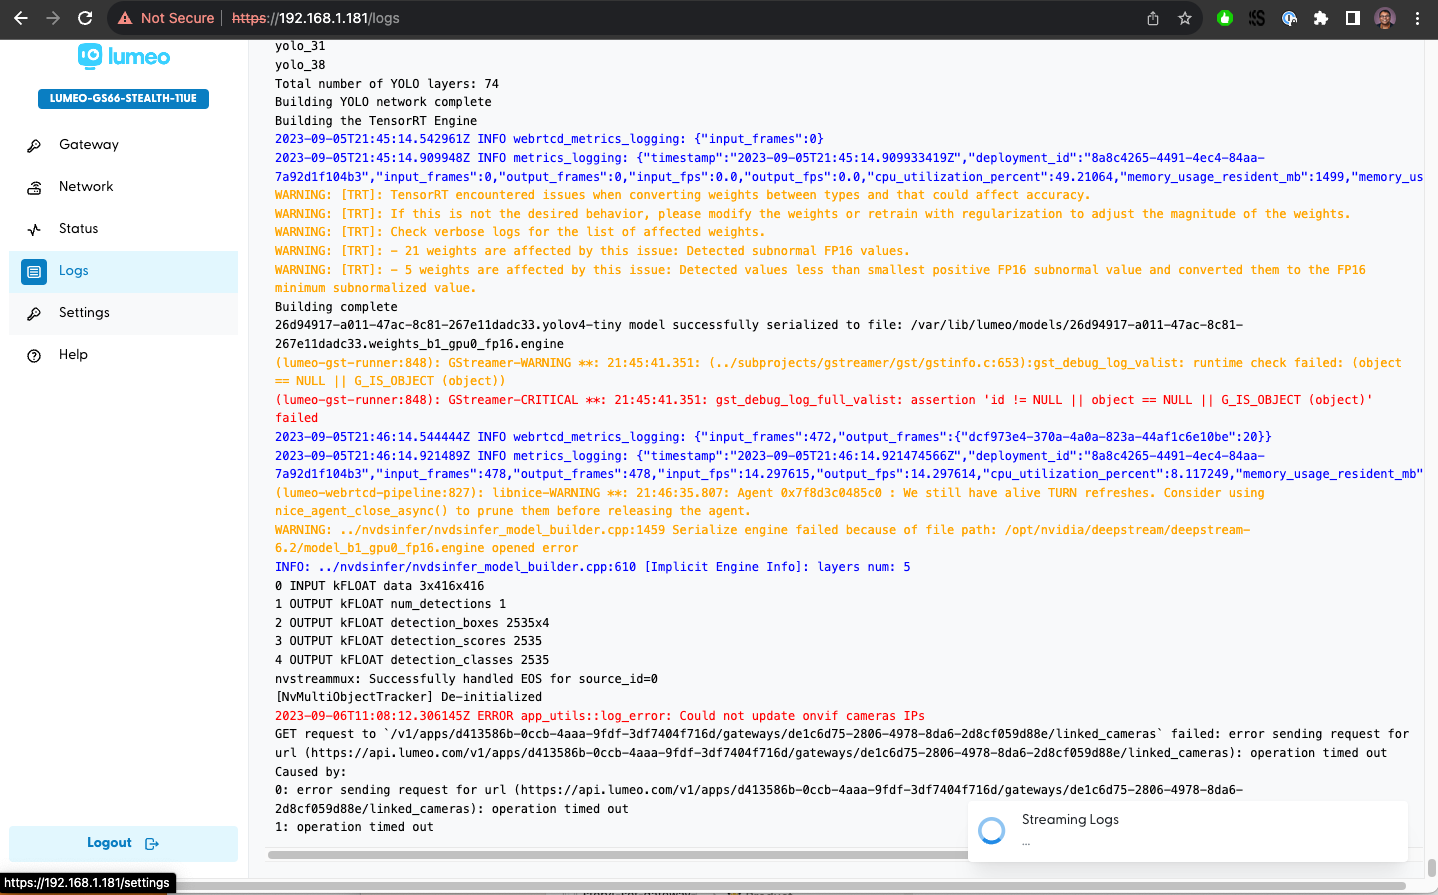
View Logs
Set System Settings
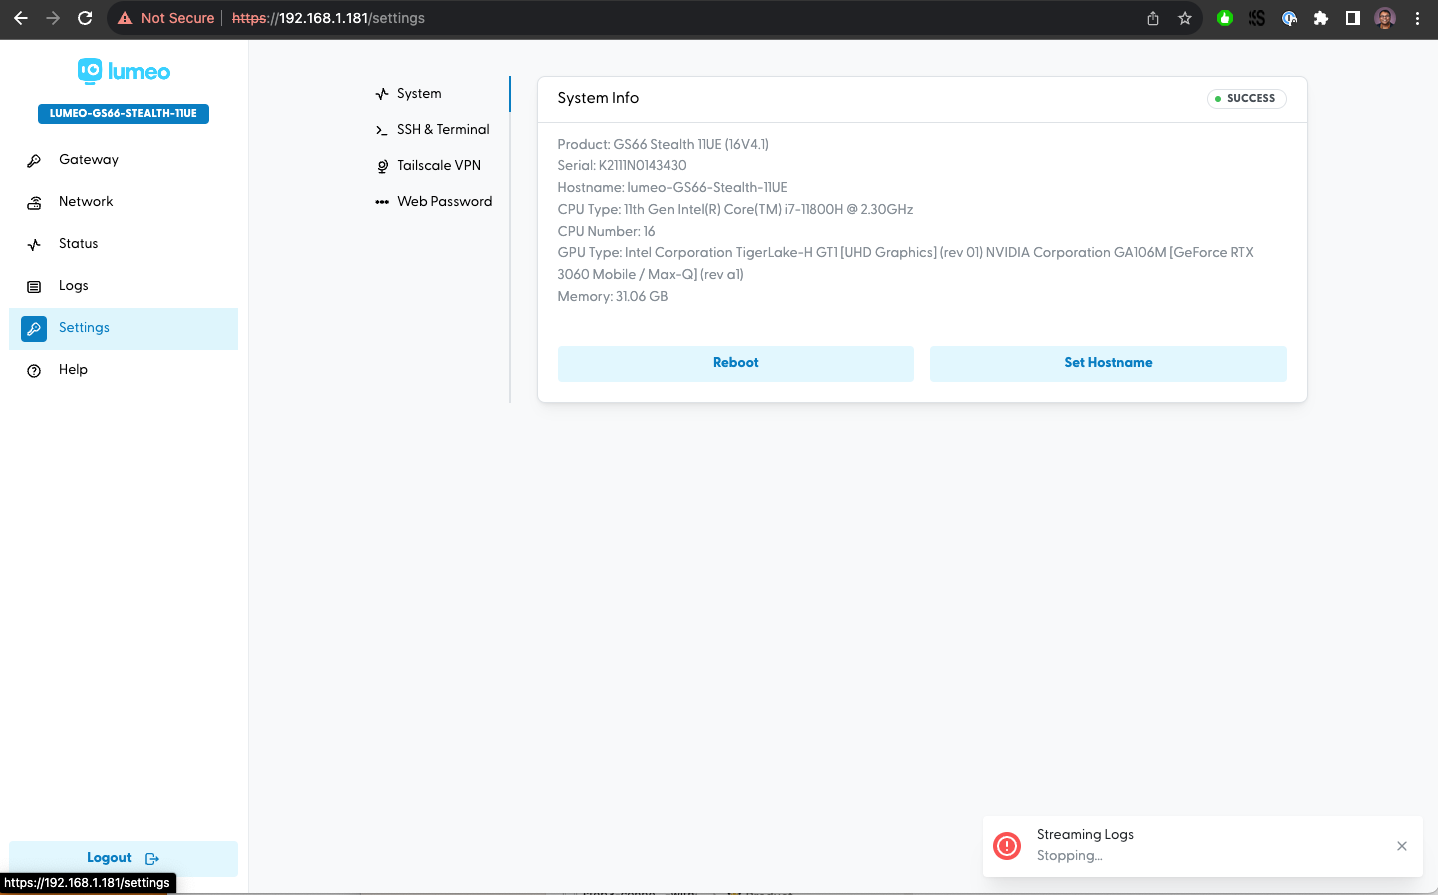
Set hostname, reboot device
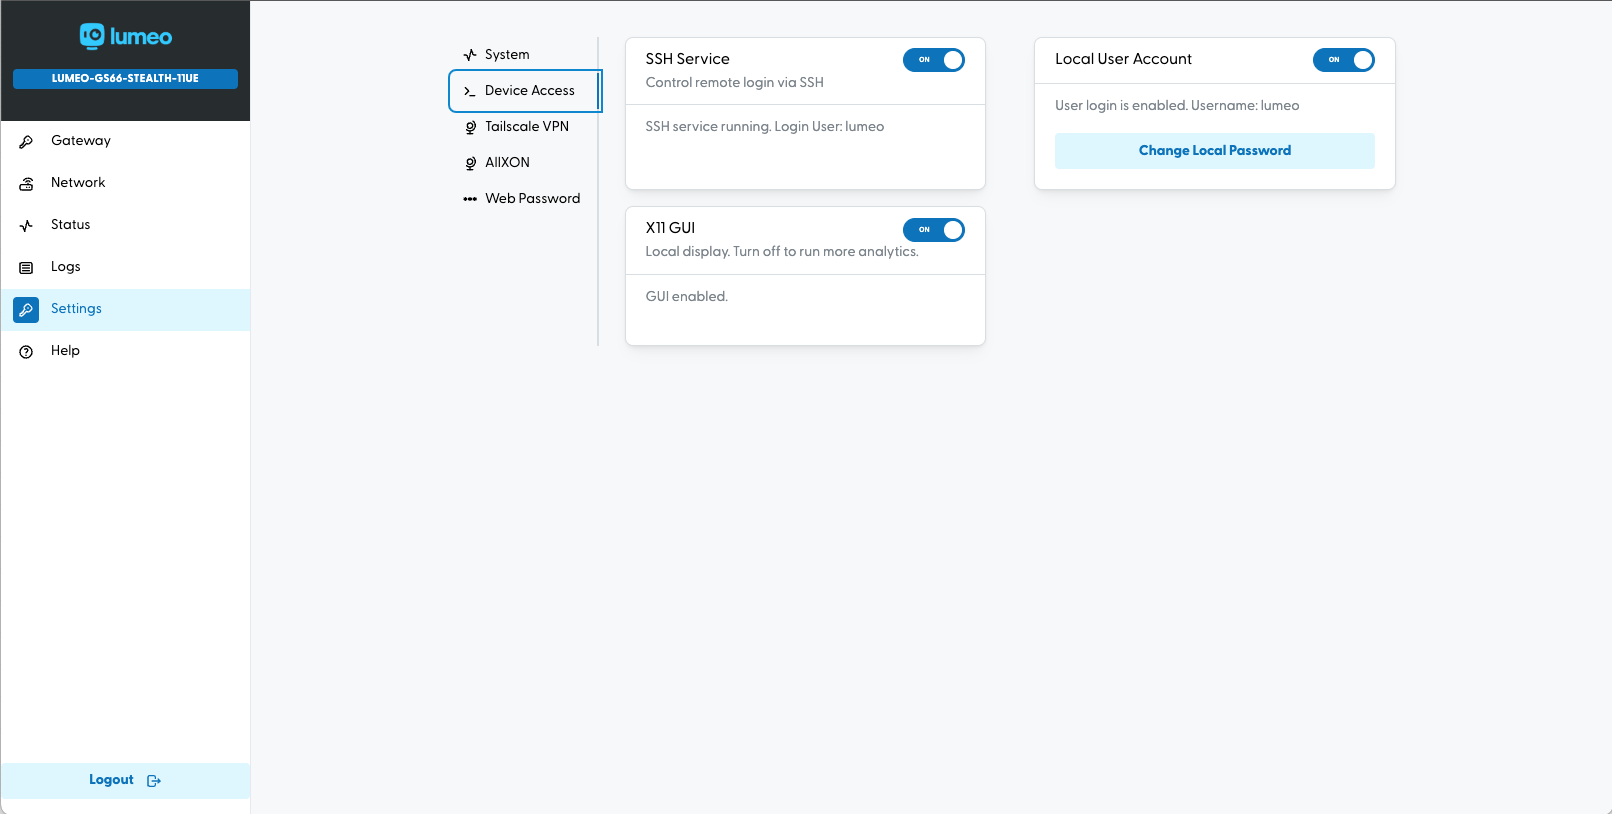
Control SSH service, local user and X11 display
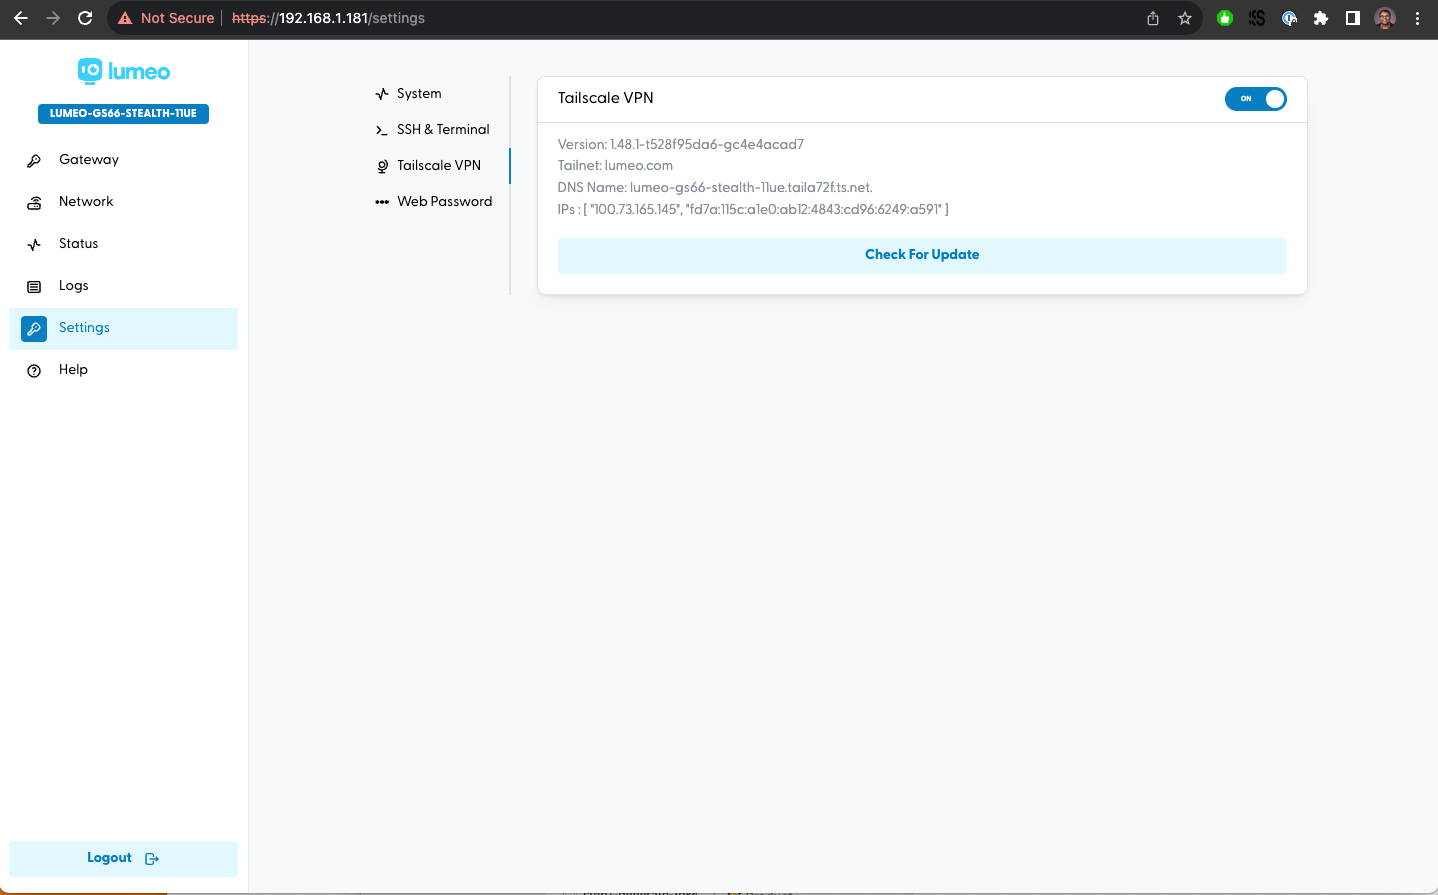
Connect to your Tailscale network for remote access
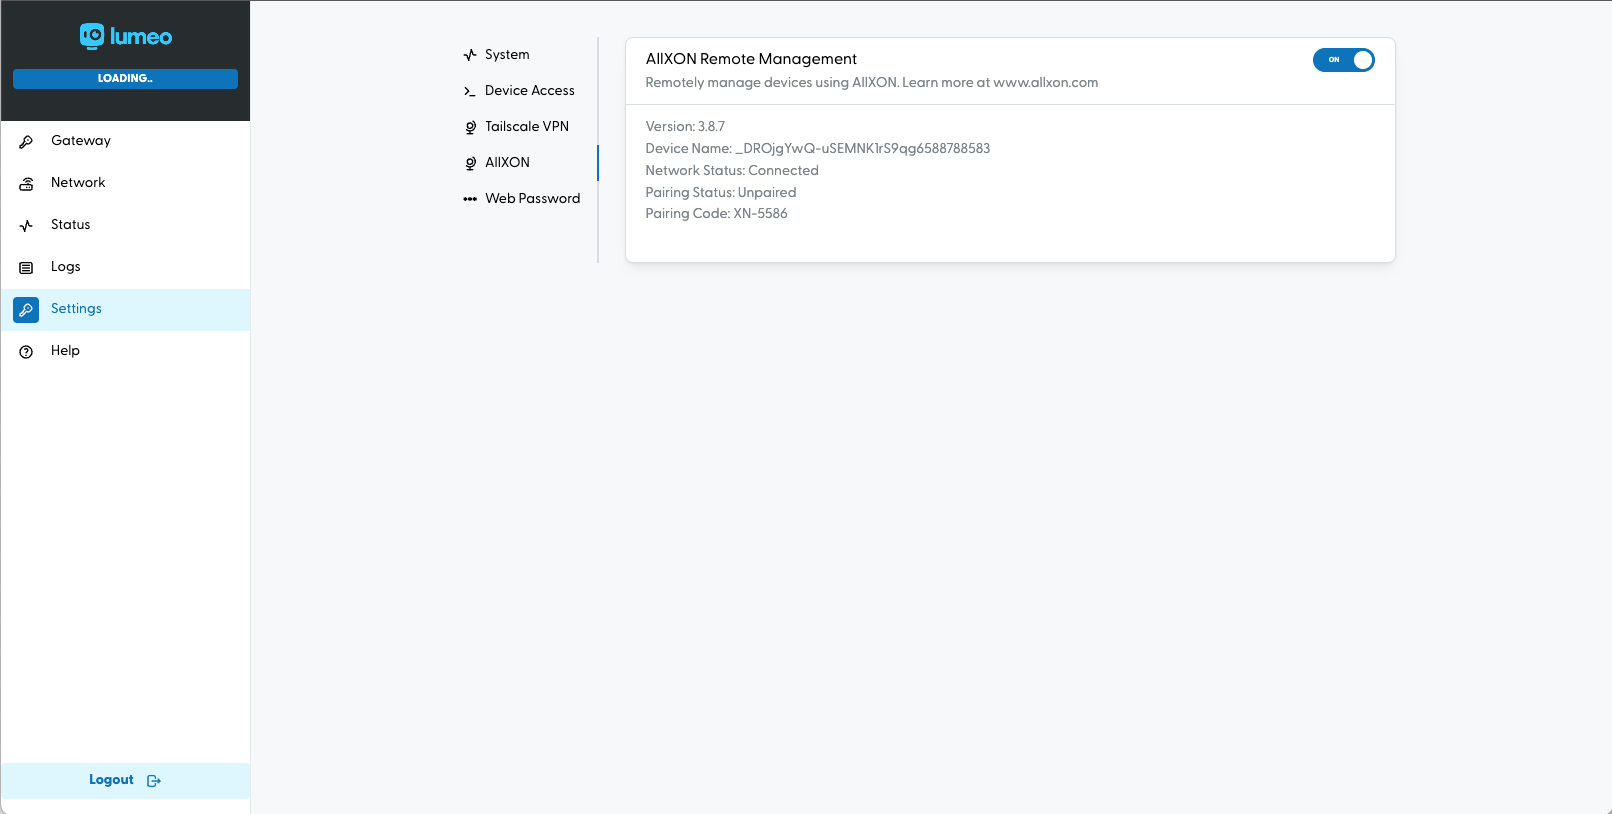
Connect your device to AllXON for remote management
Additional Help
Troubleshooting
Password Reset
You need these instructions only after you set the device password. If you haven't yet set the device password using the web interface, head over to Getting Started section above to complete the initial setup.
The device-specific web account can be reset by running the following command on a SSH or local login prompt on the device:
bash <(wget -qO- https://link.lumeo.com/wgm-pw-reset)
Blank screen when plugged into a local display
Lumeo-Ready Jetson devices come with X server disabled to maximize memory available for processing video streams. Since the configuration and management is performed via the web interface and Lumeo Console, this is an acceptable configuration for most use cases.
When X (GUI) is disabled, a "text" mode should be available when you plug them into a local display and keyboard. However, due to a Nvidia bug, Orin devices do not support the "text" display mode and will not render a display.
You can use the web interface to turn on the X server if you need access to it.
Lumeo Support
If Lumeo support needs to log into your Lumeo-ready gateway to troubleshoot remotely, we will ask you to enable support access provide us with an Auth URL. Follow the steps below to generate one.
Caution : The Auth URL can allow anyone to access your device, so please ensure you are communicating with Lumeo support when sharing the Auth URL.
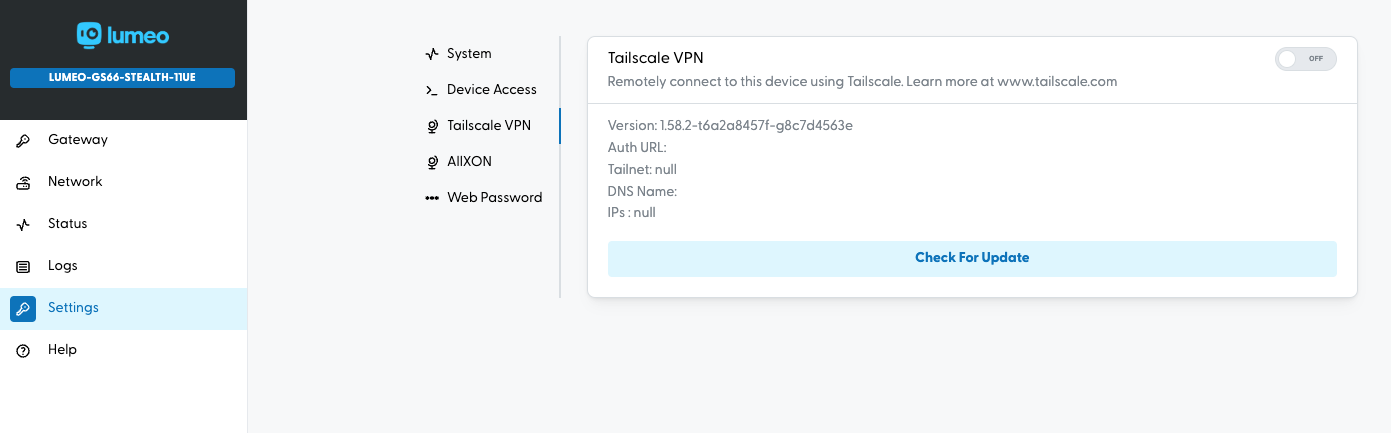
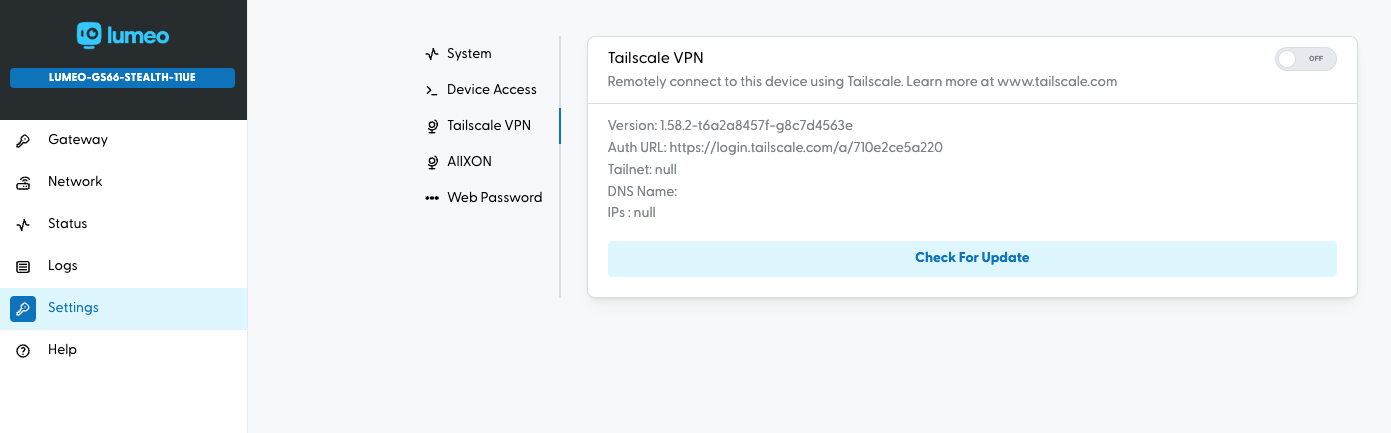
Head to Settings -> Tailscale VPN
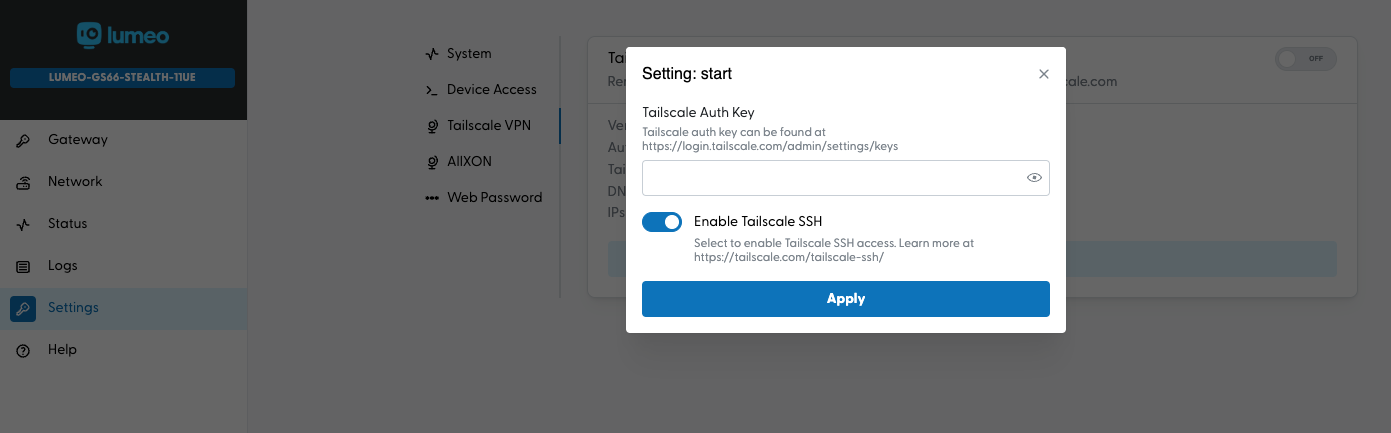
Click the "Off" button to bring up the settings dialog. Select "Enable Tailscale SSH" and leave the Auth key empty. Click Apply.
Within a few seconds, you should see the "Auth URL" field populated. Send this to Lumeo support.
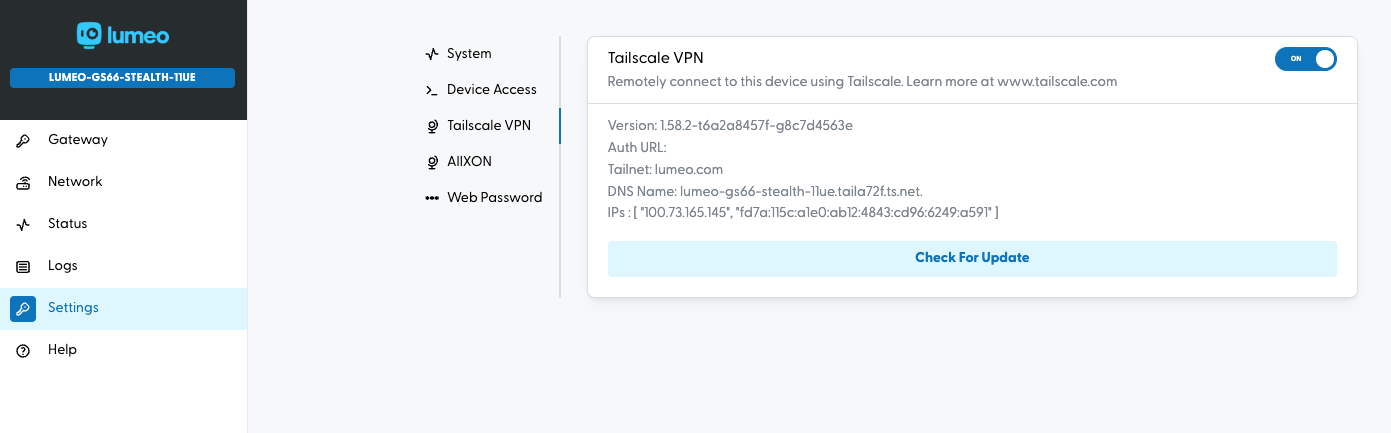
After Lumeo support connects to the device, you will see the Tailscale status automatically switch to "On". You can turn it off at any time. When support finishes the work on the device, this status will turn "Off" automatically as well.
Updated 11 months ago